
You are using an out of date browser. It may not display this or other websites correctly.
You should upgrade or use an alternative browser.
You should upgrade or use an alternative browser.
The Short History of an Old BMW (2002 project)
- Thread starter MildSeven
- Start date
MildSeven
Legacy Member
Btw, if you paint over the por while it's still sticky, you will save yourself the hassle of sanding it.
Yes, that's true, although I have never done it... I actually wasn't originally planning to topcoat, decided to do it a few days after.
MildSeven
Legacy Member
Day ~35-40 (about 5 days of work) Some Surface Rust Removal + Rubberized Asphalt Application + Fender & Door Installation + Some Body Filler
Surface Rust Clean-up
Rubberized Asphalt Undercoating
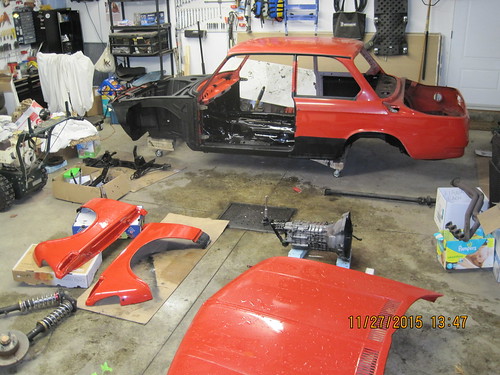
At this point I decided to tidy up the garage a little, it's been a crazy disaster for so long, that I forget what my garage looked like before. I also wanted to take the snowblower outside to make sure it's ready for the season.
Unfortunately it will still be a long time before I get it anywhere close to what it used to be.
Current State of Garage: Nov 27, 1015
Fender Re-Install
Roof + Hood Support Bars
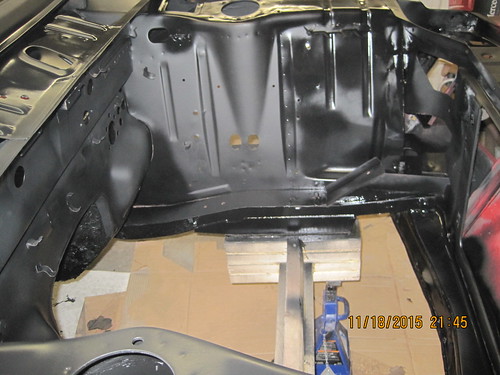
Shock Tower Patch, Body Filler
I took some detailed photos of the car highlighting all the areas that need attention for paint shops.
Current State of Garage: Dec 8, 1015

Next step... PAINT SHOP, MFs!!!!
Surface Rust Clean-up
I decided to clean up some areas which had surface rust;
- Driver + Passenger gutter rails
- Driver + Passenger ledges under the rear windows
- Driver + Passenger welds where we installed the short sill / lower quarter panel patches (in front of rear wheel)
- Driver + Passenger spot welds along the new rocker panels
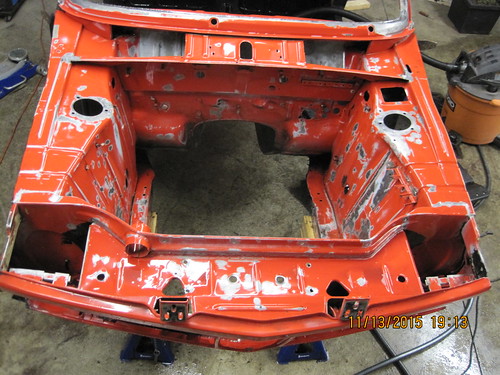
- Engine Bay
The plan was to wire-brush away the rust, then degrease, then apply Por15 Metal Ready (to eat away rust (just in case) & etch the metal). I masked off the areas I didn't want to paint, and sprayed on some Eastwood Rust Encapsulator.
I have previously used Eastwood Rust Encapsulator inside the shock towers (inner perches), frame rails and some other nook & cranny areas, with no access.

In the engine bay there were many small areas with surface rust but they were spread out, including behind all the removable metal clips (which were also rusted themselves). I wire-brushed away the rust spots, and because it was spread out, I gave did a light sanding everywhere.... that’s why the original paint looks orange instead of red.
Wet Paint
The metal (cable) clips would be too difficult to wire-brush, so I tried this Metal Rescue stuff which I had read about on the web (it's also available at Canadian Tire). It’s decent stuff, here's how it went:
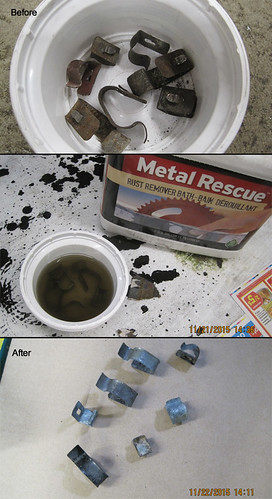
With the help of a photo I took before removing the clips, I re-installed them, then I used seam sealer in the wheel well to secure the backs of the clips. Basically the seam sealer fills the area around the tab on the back, securing it in place. I had noticed that this was how BMW originally secured them.
- Driver + Passenger gutter rails
- Driver + Passenger ledges under the rear windows
- Driver + Passenger welds where we installed the short sill / lower quarter panel patches (in front of rear wheel)
- Driver + Passenger spot welds along the new rocker panels
- Engine Bay
The plan was to wire-brush away the rust, then degrease, then apply Por15 Metal Ready (to eat away rust (just in case) & etch the metal). I masked off the areas I didn't want to paint, and sprayed on some Eastwood Rust Encapsulator.
I have previously used Eastwood Rust Encapsulator inside the shock towers (inner perches), frame rails and some other nook & cranny areas, with no access.
In the engine bay there were many small areas with surface rust but they were spread out, including behind all the removable metal clips (which were also rusted themselves). I wire-brushed away the rust spots, and because it was spread out, I gave did a light sanding everywhere.... that’s why the original paint looks orange instead of red.
Wet Paint
The metal (cable) clips would be too difficult to wire-brush, so I tried this Metal Rescue stuff which I had read about on the web (it's also available at Canadian Tire). It’s decent stuff, here's how it went:
With the help of a photo I took before removing the clips, I re-installed them, then I used seam sealer in the wheel well to secure the backs of the clips. Basically the seam sealer fills the area around the tab on the back, securing it in place. I had noticed that this was how BMW originally secured them.
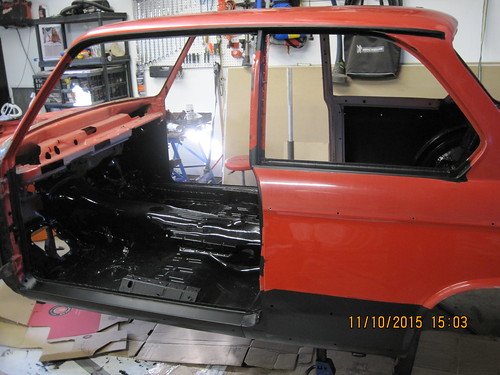
Rubberized Asphalt Undercoating
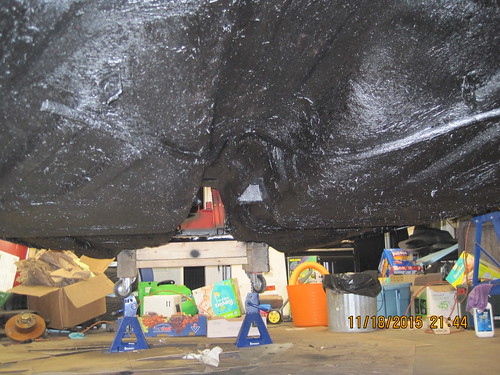
I did so much work under the car removing grinding, old seam sealer, degreasing, painting, etc. that it was a shame to cover it with this goop but for protection's sake, I had to. I put a thin layer (I'd say between 1/16" and 1/8th) and still ended up using the whole gallon. It's very pasty so takes some extra effort to apply while you're lying on your back with you arm over your head.

At this point I decided to tidy up the garage a little, it's been a crazy disaster for so long, that I forget what my garage looked like before. I also wanted to take the snowblower outside to make sure it's ready for the season.
Unfortunately it will still be a long time before I get it anywhere close to what it used to be.
Current State of Garage: Nov 27, 1015
Fender Re-Install
There were maybe 1 or 2 very light spots of rust behind each fender, they're not original (I was told they were changed in 2006), I wire-brushed the couple of rusted areas, degreased, metal ready and sprayed on 2 coats of Tremclad Rust paint (because I ran out of the Eastwood stuff).
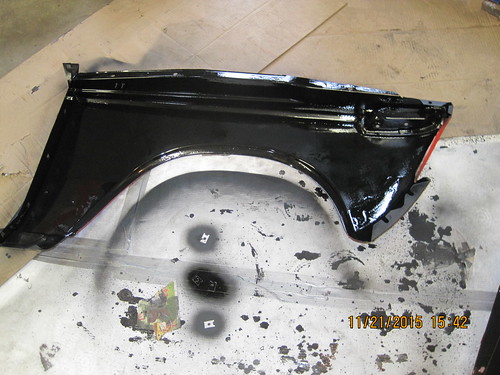
I installed the fenders without tightening the screws because I realized that I would need to re-install the doors in order ensure the belt & knee trims line-up accordingly. The doors were stored in my basement and it was not easy getting the first door (driver) on without someone's help. The bolts are short and the hinge pushes back every time you try to insert 1 of the 6 bolts, on top of that you have to hold the door.
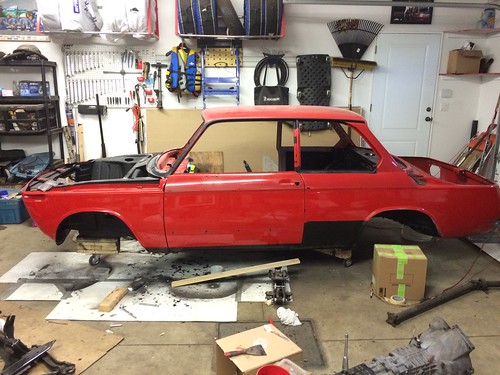
Luckily after I managed to secure the driver door my father popped-in to drop-off a "care package," some of my grandmother's homemade cavatelli and sauce. He helped me line-up the door, it still took a while. I installed all the doors in my house and this is about as much as a pain in the ass as that. He offered to return the next day to help with the passenger door as my Saturday work day was finished. I completed the passenger door and fender install with his help on Sunday.
Driver door and fender installed.
I installed the fenders without tightening the screws because I realized that I would need to re-install the doors in order ensure the belt & knee trims line-up accordingly. The doors were stored in my basement and it was not easy getting the first door (driver) on without someone's help. The bolts are short and the hinge pushes back every time you try to insert 1 of the 6 bolts, on top of that you have to hold the door.
Luckily after I managed to secure the driver door my father popped-in to drop-off a "care package," some of my grandmother's homemade cavatelli and sauce. He helped me line-up the door, it still took a while. I installed all the doors in my house and this is about as much as a pain in the ass as that. He offered to return the next day to help with the passenger door as my Saturday work day was finished. I completed the passenger door and fender install with his help on Sunday.
Driver door and fender installed.
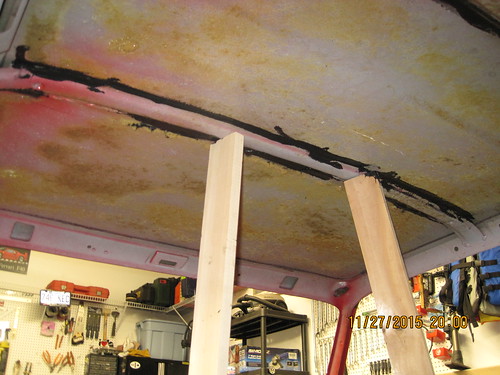
Roof + Hood Support Bars
I had noticed during the disassembly, in the interior of the car, on the ceiling, 1 of the bars which supports the roof had come unglued. It seems BMW used some adhesive strips to secure these. I used some Permatex adhesive/sealant (which is non-paintable), since this area will be hidden it didn’t matter that I made a mess of it J.
The hood which I had neglected for a long while was collecting dust at the back of the garage, the trim, rubber and other hardware were still intact, I removed it all. I degreased the back side of the hood but there was also some baked-on gunk which required some scraping. At this point I noticed (similar to the support roof) a support bar had come unglued. I used the same adhesive to secure the bar to the hood sheet metal, except this time I masked off the areas which will be painted. I used a bucked (of industrial cement sealer) to hold the bar down while the adhesive cured, I used a couple of boxes to keep the bucket from falling over.
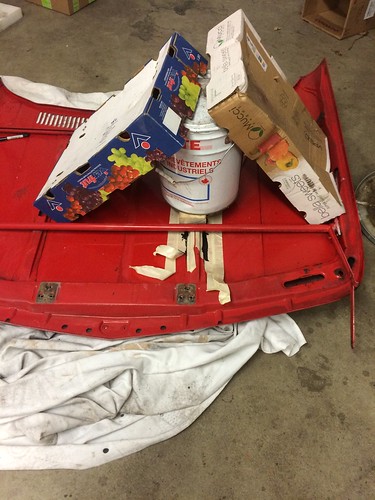
The hood which I had neglected for a long while was collecting dust at the back of the garage, the trim, rubber and other hardware were still intact, I removed it all. I degreased the back side of the hood but there was also some baked-on gunk which required some scraping. At this point I noticed (similar to the support roof) a support bar had come unglued. I used the same adhesive to secure the bar to the hood sheet metal, except this time I masked off the areas which will be painted. I used a bucked (of industrial cement sealer) to hold the bar down while the adhesive cured, I used a couple of boxes to keep the bucket from falling over.
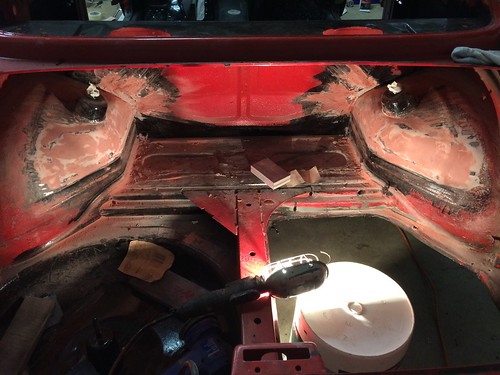
Shock Tower Patch, Body Filler
If you haven’t noticed by reading this thread, I like trying to do things myself... and that’s the story with the bondo. For the shock towers, I figured; 1) the repair would be hidden, 2) it’s a good learning experience/practice... and most importantly 3) I’m a cheap bastard.
It took me about 4 coats but, I’m satisfied with the outcome.
It took me about 4 coats but, I’m satisfied with the outcome.
I took some detailed photos of the car highlighting all the areas that need attention for paint shops.
Current State of Garage: Dec 8, 1015
Next step... PAINT SHOP, MFs!!!!
Last edited:
MildSeven
Legacy Member
Those headlights in the video look mega dope. You should def look into that.
*tu*
nice, but not classic looking.
If I went the fender flare route, maybe.

MildSeven
Legacy Member
Day ~41 (about 1 day of work) Seat Rail Renewal, Shipping the carcass to Bodyshop
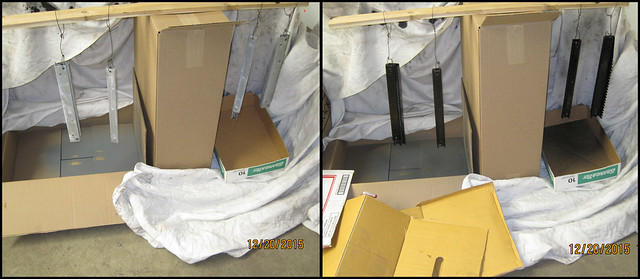
Seat Rail Refresh
Soon after I purchased the 02, I discovered the seat rails were a rusty mess, I had looked in to getting another set at the time but Aardvark Racing (who sold the previous owner the Reccaro seats), said he was out of stock and I would be better off ‘de-rusting’ them. Fast forward to the project… I degreased the rails, gave them a bath in the Metal Rescue solution (for ~30hours), wire brushed, rinsed, dried, painted and re-greased them. It’s a shame I forgot to take a before photo .
.
Seat Rail “Clothesline” for spray paint.
Bodyshop
The original plan which dates back a year was to send the car to Strasse for bodywork & paint, turns out they’re all booked up (for bodywork) until April’ish, so I went out to get a few more quotes (from shops with good reputations or were referred to me).
My father-in-law referred me to the shop where he gets work done. It was a father & son deal where the son (Frank) has now taken over the reins and does everything himself. He seems like a nice/good guy and I’m confident he’ll do a good job.
The shop is in the east end, off industrial called: C L Auto Body (10760, av Jean-Meunier, Montréal-Nord, QC H1G 4S4 | 514-325-6463).
Now it was a matter of getting the car there.
Transport
Plan A, F150 with double ATV Trailer. My father-in-law (who’s vacationing in Florida) has a F150 and had an old double ATV trailer (which was now at his friend’s shop), I wanted to get the car to paint before there was snow on the ground. Unfortunately when I went to pick-up the trailer, I discovered, the sides were too high, thus making the trailer too narrow for the overall shell.
Plan B, Uhaul. I was going to call Uhaul to rent either a 10x6 trailer, hoping the ramp/gate is removable or if it wasn’t an auto transport trailer. I called Uhaul to find out the ramp/gate is not removable so the length of 10’ would not be enough, the agent also told me that the auto transport trailers were all in Florida and he could locate one for me (would take a few weeks) but when I explained him what I was towing he said it wouldn’t work because the trailer has two rails (for the car’s wheels) and the casters I installed on the shell would not end up in those rails. I said I could put a plank of wood across or something, he said uhaul wouldn’t allow that.
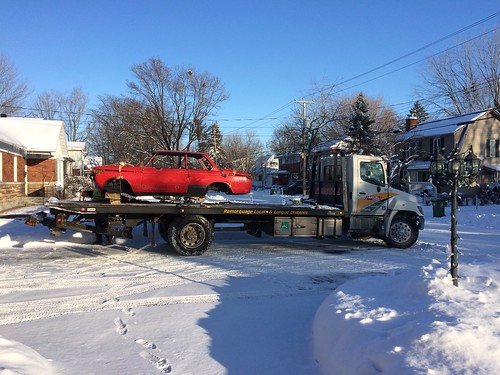
Plan C, Flatbed. My mother-in-law’s cousin’s husband is Mike Burstall (of Burstall & Conrad Towing). I figured they be pricey because the have exclusive rights to the highways and I’ve had cars towed from the highway a few times for a pretty penny. Mike helped out for a very fair price of $0.
I finished packing up the car to ship.
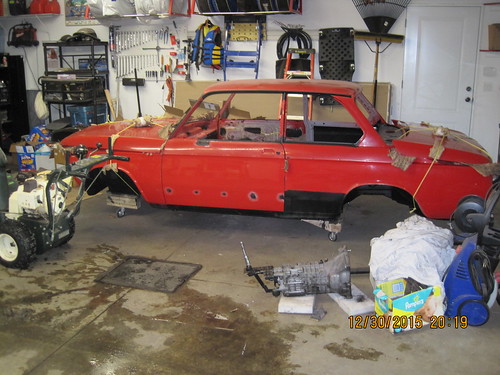
Loaded up
Now we play the waiting game and in the meantime refresh some more parts, including the full rear-sub-frame.
Current State of Garage: 2016-01-04

Seat Rail Refresh
Soon after I purchased the 02, I discovered the seat rails were a rusty mess, I had looked in to getting another set at the time but Aardvark Racing (who sold the previous owner the Reccaro seats), said he was out of stock and I would be better off ‘de-rusting’ them. Fast forward to the project… I degreased the rails, gave them a bath in the Metal Rescue solution (for ~30hours), wire brushed, rinsed, dried, painted and re-greased them. It’s a shame I forgot to take a before photo
.Seat Rail “Clothesline” for spray paint.
Bodyshop
The original plan which dates back a year was to send the car to Strasse for bodywork & paint, turns out they’re all booked up (for bodywork) until April’ish, so I went out to get a few more quotes (from shops with good reputations or were referred to me).
My father-in-law referred me to the shop where he gets work done. It was a father & son deal where the son (Frank) has now taken over the reins and does everything himself. He seems like a nice/good guy and I’m confident he’ll do a good job.
The shop is in the east end, off industrial called: C L Auto Body (10760, av Jean-Meunier, Montréal-Nord, QC H1G 4S4 | 514-325-6463).
Now it was a matter of getting the car there.
Transport
Plan A, F150 with double ATV Trailer. My father-in-law (who’s vacationing in Florida) has a F150 and had an old double ATV trailer (which was now at his friend’s shop), I wanted to get the car to paint before there was snow on the ground. Unfortunately when I went to pick-up the trailer, I discovered, the sides were too high, thus making the trailer too narrow for the overall shell.
Plan B, Uhaul. I was going to call Uhaul to rent either a 10x6 trailer, hoping the ramp/gate is removable or if it wasn’t an auto transport trailer. I called Uhaul to find out the ramp/gate is not removable so the length of 10’ would not be enough, the agent also told me that the auto transport trailers were all in Florida and he could locate one for me (would take a few weeks) but when I explained him what I was towing he said it wouldn’t work because the trailer has two rails (for the car’s wheels) and the casters I installed on the shell would not end up in those rails. I said I could put a plank of wood across or something, he said uhaul wouldn’t allow that.
Plan C, Flatbed. My mother-in-law’s cousin’s husband is Mike Burstall (of Burstall & Conrad Towing). I figured they be pricey because the have exclusive rights to the highways and I’ve had cars towed from the highway a few times for a pretty penny. Mike helped out for a very fair price of $0.
I finished packing up the car to ship.
Loaded up
Now we play the waiting game and in the meantime refresh some more parts, including the full rear-sub-frame.
Current State of Garage: 2016-01-04
Last edited:
Bob Jones
Legacy Member
I meant to tell you that the other day I think your tree was not in the optimal position in the house. You could have picked a better spot for it.
You seem to be getting lots of stuff for free. I think you should also let people know how many peepee touches you have had to give and receive for the free favors. Just for people to know how much they have to whore themselves out to get the job done!
What color did you decide on Finally? Or is it a surprise? Should we take bets on the color?
Last edited:
persianrider
Legacy Member
wait wait wait
Anthony!!!! I totally forgot your user name was MildSeven! That DASHING Xmas picture just jolted my mind!
Wow bro... this project is amazing and I've been following it for so long... only now it clicked who you were....
Anthony!!!! I totally forgot your user name was MildSeven! That DASHING Xmas picture just jolted my mind!
Wow bro... this project is amazing and I've been following it for so long... only now it clicked who you were....
MildSeven
Legacy Member
I meant to tell you that the other day I think your tree was not in the optimal position in the house. You could have picked a better spot for it.
You seem to be getting lots of stuff for free. I think you should also let people know how many peepee touches you have had to give and receive for the free favors. Just for people to know how much they have to whore themselves out to get the job done!
What color did you decide on Finally? Or is it a surprise? Should we take bets on the color?
where should I put my tree next year?
it's going to be the same colour Verona Red, if I'd change it... then I'd do turbo flares and other shit, don't want to get in to that, baba.
wait wait wait
anthony!!!! I totally forgot your user name was mildseven! That dashing xmas picture just jolted my mind!
Wow bro... This project is amazing and i've been following it for so long... Only now it clicked who you were....
thanks, now let's make out!
persianrider
Legacy Member
thanks, now let's make out!
bro I know you always liked my big lips....
you should see my ass now... been squattin like a biatch
MildSeven
Legacy Member
I still have some round taillights, I think alpina front fender & random stuff from mines. All free for you if you need them.
thanks a lot homie!
PassatDub
Moderator
You seem to be getting lots of stuff for free. I think you should also let people know how many peepee touches you have had to give and receive for the free favors. Just for people to know how much they have to whore themselves out to get the job done!
What color did you decide on Finally? Or is it a surprise? Should we take bets on the color?
I still have some round taillights, I think alpina front fender & random stuff from mines. All free for you if you need them.

MildSeven
Legacy Member
Day ~42 - Rear Sub-Frame Refresh
Body Shop Update (January 8th)
I dropped off the car for paint on January 4th, since then I haven’t done much 2002 work. On January 8th, I had to drop of my father-in-law’s F150 for some bodywork (while he’s on vacation), I hadn’t expected Frank to start on the 2002 but surprisingly he started some body work on the roof and nose.

Rear Sub-Frame Disassembly
It was time to start some work on the rear sub-frame which hadn’t been touched since it was remove last spring (aside from being moved from the back to the side of the garage). The plan was to give it the same treatment the front sub-frame received; grind it down, degrease, metal etch, por15 & re-assemble with urethane bushings.

Differential Hangar
The first thing I noticed which I hadn’t noticed before is that the differential bracket seemed to be missing a metal sleeve. I’d like to believe it somehow got lost from the time I remove it from the car to now, but there isn’t many places it could have went in my garage without being seen or found. Regardless, I had a new set of bushings to insert with new sleeves (included with bushing kit for rear-end), so I’ll pretend it was there and I lost it.

Axel Carrier
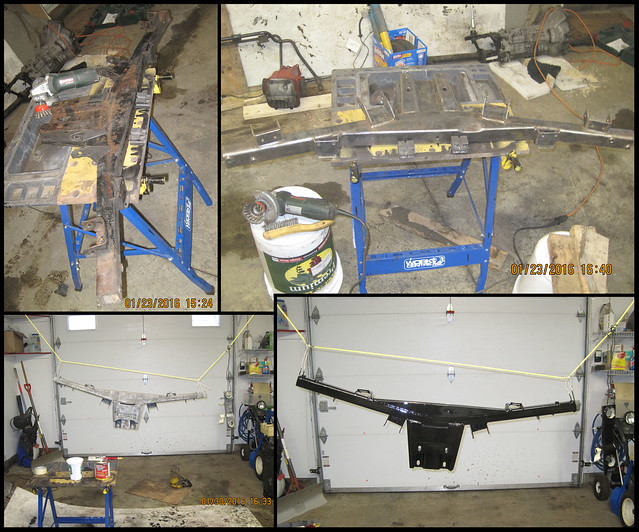
Following the disassembly of the rear sub-frame I started grinding down the axle carrier to prep it for the whole por15 process. There was a significant amount of rust, sand and dirt trapped inside it, the photo I took really doesn’t do the pile of dirt justice. I think the cleaning alone provided a weight reduction of 1lb.

I gave both the axle carrier and differential hangar the usual pre-por15 treatment, then I made a “clothes line” to hang the parts while painting them with por15. I used the Eastwood internal frame paint extension hose/nozzle to paint inside the axle carrier.
You might be wondering why I didn’t paint the trailing arms at the same time as the other pieces… well there are 2 reasons for that, one of them was known and the other was a surprise.
The Known:
Previously, during the disassembly (last spring), I found out that the spring perch on the trailing arm (passenger side) had rusted through (half the circumference). I was hoping to find a used replacement or have someone weld in a patch-in, because a new one is $1014usd (the price actually went up from $970 2 weeks ago).
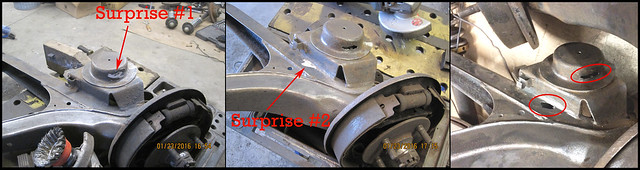
The Surprise:
At this stage of the project I assumed there would be no more bad surprises, unfortunately I was wrong.
Before I starting work on the driver side trailing arm, I noticed that it looked as though it was in much better condition than the passenger side. I figured maybe it had been previously replaced. Unfortunately, looks were not skin deep, while grinding away I discovered it had a hole (same issue as the passenger side, surprise #1) with the addition of another hole (surprise #2). The horrible part about this is that they were both “repaired” with body filler. I can only assume a previous owner was duped by a body shop because I doubt anyone would agree to this, not to mention the spring perch is completely hidden when installed (rubber bushing).
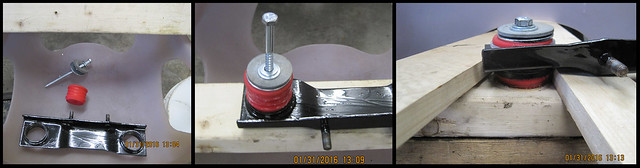
Differential Hangar Bushings
In order to press the new polyurethane bushings in I used a lag bolt (a log wood screw), a few washers and an old piece of 2x4. Here's a photo of what I did which worked very well. I assumed I didn't need to lubricate these bushings as wouldn't be moving but did it anyway since I have extra lube.
Carrier Mounts
They were in good shape and look like they've been previously changed, especially since the BMW part sticker was still mostly intact.
I cleaned them up, wire brushed and painted.
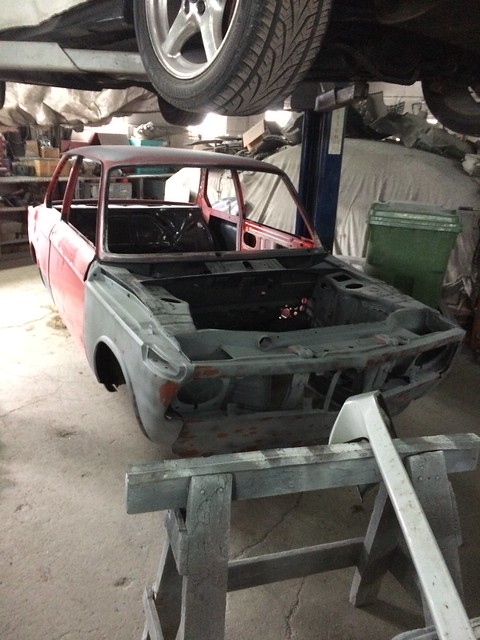
Body Shop Update (January 29th)
It was a beautiful day outside so I decided during my lunch break, I'd make the trek from to Montreal-North. As I have previously mentioned, Frank was taking on the job between others so I didn't expect much. He had completed bodywork on the front portion of the car and put it aside to work on some other jobs.
Body Shop Update (January 8th)
I dropped off the car for paint on January 4th, since then I haven’t done much 2002 work. On January 8th, I had to drop of my father-in-law’s F150 for some bodywork (while he’s on vacation), I hadn’t expected Frank to start on the 2002 but surprisingly he started some body work on the roof and nose.
Rear Sub-Frame Disassembly
It was time to start some work on the rear sub-frame which hadn’t been touched since it was remove last spring (aside from being moved from the back to the side of the garage). The plan was to give it the same treatment the front sub-frame received; grind it down, degrease, metal etch, por15 & re-assemble with urethane bushings.
Differential Hangar
The first thing I noticed which I hadn’t noticed before is that the differential bracket seemed to be missing a metal sleeve. I’d like to believe it somehow got lost from the time I remove it from the car to now, but there isn’t many places it could have went in my garage without being seen or found. Regardless, I had a new set of bushings to insert with new sleeves (included with bushing kit for rear-end), so I’ll pretend it was there and I lost it.
Axel Carrier
Following the disassembly of the rear sub-frame I started grinding down the axle carrier to prep it for the whole por15 process. There was a significant amount of rust, sand and dirt trapped inside it, the photo I took really doesn’t do the pile of dirt justice. I think the cleaning alone provided a weight reduction of 1lb.
I gave both the axle carrier and differential hangar the usual pre-por15 treatment, then I made a “clothes line” to hang the parts while painting them with por15. I used the Eastwood internal frame paint extension hose/nozzle to paint inside the axle carrier.
You might be wondering why I didn’t paint the trailing arms at the same time as the other pieces… well there are 2 reasons for that, one of them was known and the other was a surprise.
The Known:
Previously, during the disassembly (last spring), I found out that the spring perch on the trailing arm (passenger side) had rusted through (half the circumference). I was hoping to find a used replacement or have someone weld in a patch-in, because a new one is $1014usd (the price actually went up from $970 2 weeks ago).
The Surprise:
At this stage of the project I assumed there would be no more bad surprises, unfortunately I was wrong.
Before I starting work on the driver side trailing arm, I noticed that it looked as though it was in much better condition than the passenger side. I figured maybe it had been previously replaced. Unfortunately, looks were not skin deep, while grinding away I discovered it had a hole (same issue as the passenger side, surprise #1) with the addition of another hole (surprise #2). The horrible part about this is that they were both “repaired” with body filler. I can only assume a previous owner was duped by a body shop because I doubt anyone would agree to this, not to mention the spring perch is completely hidden when installed (rubber bushing).
Differential Hangar Bushings
In order to press the new polyurethane bushings in I used a lag bolt (a log wood screw), a few washers and an old piece of 2x4. Here's a photo of what I did which worked very well. I assumed I didn't need to lubricate these bushings as wouldn't be moving but did it anyway since I have extra lube.
Carrier Mounts
They were in good shape and look like they've been previously changed, especially since the BMW part sticker was still mostly intact.
I cleaned them up, wire brushed and painted.
Body Shop Update (January 29th)
It was a beautiful day outside so I decided during my lunch break, I'd make the trek from to Montreal-North. As I have previously mentioned, Frank was taking on the job between others so I didn't expect much. He had completed bodywork on the front portion of the car and put it aside to work on some other jobs.
Bob Jones
Legacy Member
I know what i'm talking about bro... All this time he's been selling ass on the streets! :ky: